Friday, October 30, 2015

"Disny the Dead" Zombie Baby

Tonight I took a timeout from pottery projects to work on my Halloween costume. If anyone knows me, they know how much I love creating cool as shit costumes! And scaring the kids. *here's your warning, if you're gonna be offended you should probably split, taking this message: I think this is hilarious, and that's why I'm happy, living the dream*
Please meet Disny. She's a Zombaby, and half of my costume this year. She's a typical baby, except for a few character traits that make her special. Well, she's an aspiring artist as well. I would love to share with you how I made her!
We have this fantastic second hand store in Canmore and I've found so much great stuff for Loft Living, my studio and for my travelling pottery show. 
Today I found this red tag doll, 50% off. Along with a $1 bag of face paint, this little pumpkin candy holder which is the perfect size for Disny, and two half price growlers for my Kombucha experiment! Eight bucks total. I says, "Pardon me?" John's like, "I know! All red tags!" Winning.
I already started adding gesso to the dolls body when I recognized the opportunity for a blog post. Here she is, all cute and innocent with her dress as a do rag. 
I loved her adorable little eyes, but they were too sweet for a Zombaby who just found her way to be a Halloween costume!
I gave this Dollie a good coat of gesso with a sponge. I dabbed it on so it would have texture rather than brush strokes. I apologized to her repeatedly and assured her little spirit that I adore her as is. She's actually quite forgiving. And asked that I play some musics. I found a Disney stamp on her neck, and gave her a name. It's appropriate don't you agree?
As the gesso cured I assembled acrylic paints, brushes, a salad tray for a palette and started mixing. For the Zombie Grey I mixed white with a blob of black and green. I used the same sponge that I used for the gesso to sponge the color all over. Even though the hair is covered, I used packing tape to mask the very edges of the hairline, and it helped hold the turban in place.
Next, I started mixing a Zombie Flesh colour. I used white, red, yellow and a touch of the Zombie Grey. Skin is not pink. It's kind of green in some light. So, I mottled it with two different sized bristle brushes, this kept the fleshy textures consistent. 
Here's a good close up of her little Zombaby face. This doll has a flat face and there's no contour whatsoever. I used a much Darker Shadow Grey to create deep eye sockets. Her features popped once I added a layer of Light Grey. The lips have Blood Red added, which is the color I also use for the wounds. 
Zombaby's wound is built up using one ply of toilet tissue and my favourite acrylic medium Mod Podge. It's glossy, so it creates depth to the Wound Red and Blood Red. Wound Red is simply a dab of red with some of the Zombie Grey. Blood Red has a dab of black in the red. 
Now for the gross part. I used pieces of toilet paper, Mod Podge and the Blood Red to make fleshy bits in her little monster hands. 
 
That's disgusting. But wait til you see what happens next!
Pallette


Disny Zombaby! Ready for Trick or Treats!


Tuesday, October 20, 2015

Clean your dryer!

Let's Talk! Tuesday Tips Anyone?!

There's this inconvenient phenomenon that occurs in my laundry. Tissues get left in pockets. So they end up exploding in my washer and then in my dryer. Today after it happened I had this strange urge to vacuum out the lint catcher in my dryer. I want to say something funny and witty, but I think it's really more important that you take me seriously about this for a few minutes! Here's my Pinterest, to give my Tip credibility!            Visit Tamara M. Hannah's profile on Pinterest.   

First I removed the lint catcher and started to run hot water on it. The water was beading off, rather than draining through the mesh. I said to myself, "I think this was a good idea!" and grabbed the soap and a scrub brush. Next, I took the Dyson with the crevice tool and started to clean out the area that holds the lint catcher.....

THIS IS WHAT WAS IN THERE! I had to empty the Dyson vacuum 3 times! 
 Needless to say, I did some investigating, just to find out how all of this works. This "grate" comes off of the inside of the dryer wall just below where the lint catcher rests. Once I took it off a PILE of lint and about half a cup of sand fell out of the crevice that it covered! I was shocked and grossed out. This is how houses burn down. 


Next, I scrubbed the build up from the grate, this is how my lint catcher looked also. I vacuumed the rest of the gap where the lint was building up. I could fit my whole hand down there and was gathering hand fulls of lint. Ok, so this dryer was a second hand jobbie that was in my loft when I moved in. It didn't occur to me that cleaning it was a necessity. I'm sharing this well learned lesson with you today for the simple fact that I think it's pretty unsafe. 


 Here is my washed out lint trap! 


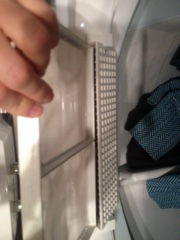
Here is a weird angle of the whole area that the grate piece screws on to and then where the lint catcher would sit. This photo is after I cleaned it all out.


Here's the clean grate being screwed back onto the inside of the dryer. 


And inserting my clean lint catcher back into its holder. 

This situation made me nervous because sometimes I like to leave the dryer running when I leave the loft for work in the afternoon. Riggs isn't very good at calling 911 if you know what I mean.

So take a few minutes when you load the dryer next time and see if you have any build up in your lint catcher! This whole project only took me about half an hour, it was worth it!

This certainly isn't my most sparkly, bubbly, glittery post to date. And you'll adjust. It can't all be rainbows and kittens! 

Hey, I know how to make you feel better! 


You'll get linked up to my Pottery Verve 2015 Survey, and if you take 3 minutes to fill out my easy peasy survey...
You could win a Jack O' Lantern mug made by me! 

Thanks for following Pottery Verve xo


Wednesday, March 18, 2015

Hot Tips! Pottery tips to change your studio life a little wee bit!


Hey Pottery Pals!
Today I have to share with you some awesome hot tips!
First, "The Best Tip Ever"


You know when your underglaze lids get all crusty and dried out and really hard to open? I personally just changed my own life! Put a thin layer of Petroleum Jelly a.k.a. Vaseline, around the lid and rim of the jars. Ta-Daa! You're welcome! Saves your wrists, thumbs and time.
Not only that! It also helps seal the lids so they are a bit air tight. This helps them last longer. Hey, you know how to make your underglazes last a really long time? 
Tip #2: add water to your underglazes when you first get them. Brand new underglazes are my absolute favourite. I started using a few commercial neon glazes also. If you split off the jar into another old jar, maybe you're empty jar, you're underglazes will last twice as long. Besides, I find a couple of thin coats is better than one thick coat. Drop a round pebble or two in the jars to help shake them up when it's time to go!
Tip #3: always have the jar sitting on the table while you open it. You know why? Ever spill a whole new jar of underglaze all over your breasts while teaching a class? Ya. BTDT. Tossed the Tshirt.
Tip #4: the mini mixers are great to remix all your dried up product! 

Make sure you put some of the Vaseline on the rim of the mixer and the lid! 
Tip #5: a toothbrush can be your best cleaning tool. Glazes dry hard sometimes and stick in the worst crevices! I have about 20 toothbrushes in the studio.
Well! Take my advice today and save yourself some moolah! Potters are poor!
Bonus tip:
Use a sharpie,


And label ALL THE THINGS! 


It makes it so much easier on "Artist Brain" while you're in the zone. 


Wednesday, March 11, 2015

Make your own LegWarmers! #MYOL

There's alotta hashtags going around in my head! #MYOL so much fun!

This great, simple, Beginner's crochet pattern will get you through spring yoga sessions like a whiz! I am making fluorescent pink ones to start off!


EASY Crochet
These leg warmers will be most appreciated in the dead of winter when temperatures plummet and winds wail, but be sure to have them crocheted and ready to wear.  
Directions are given for size 9-11.  You will need two 4 ounce, skeins of 4 ply yarn and sizes I and K crochet hooks. 
Gauge: 3 hdc equal 1 inch 
Starting at lower edge with smaller ,hook, ch 30, join with sl st to form ring, ch 2, do not turn.
Row 1: Sc in each ch, join with sl st in top of ch-2, ch 2, do not turn.
Rows 2 through 8: Repeat Row 1.
Row 9: With larger hook, ch 2, hdc in each sc across, join with sl st in top of ch-2, ch 2, turn.
Repeat Row 9 to length desired, after last sl st, fasten off

Comment below for a chance to win a Yoga Sesh with me at Electric Cobra Yoga!


Friday, March 6, 2015

#DYOM

DESIGN YOUR OWN MUG!
You get to choose and personalize your very own Pottery Verve Mug!
20 oz mug $40
16 oz mug $30


- grab a sharpie and sketch paper and draw out your design
- choose from any glaze finish
-in four to five weeks your mug will be ready to be picked up
-all special orders must be pre-paid by cash, credit, emt or paypal
LET’S DO THIS!


Monday, March 2, 2015

March came blasting in!

It seemed like a whirlwind snowstorm brought March in! Have you seen my Electric Cobra Yoga Facebook dealio?
Click this:


It is time now for Kapha season which begins around March and continues until around June. We also know how much we all just want winter to get it over with already and bring on spring! 

I lurched around today as though watching a drone of myself carry out tasks, feeling heavy, as though my actions were working against me. When I noticed annoyance creeping up in the parking lot at the bank I gave a meagre smile out, wishing I hadn't left the house. Now that I am aware of my self care, through my yoga practice, I am inspired to find ways to cope with balancing these days of low, sluggish energy. Calling the government squashed my intentions today. My solution was a 2 slice dose of Donair pizza, big bottle of Canada Dry and two naps. My old habit of self medicating won out over any healthful solution in the moment. Going with the flow didn't really hurt that much.

After my second nap I started looking for a few yoga poses to help out my weird, sluggish body feeling. Sun Salutations are a great way to get moving! I like to promise myself to start with 3 on each side. After 3, sometimes I am ready to add in a couple more. I like to do the movements to my breath. 

Adding poses like Matsyasana Fish pose, Ustrasana Camel pose and Paripurna Navasana Boat pose  
Camel pose

to my practice today will help me release all that "i'm so sick of winter" stagnant energy from my body. You can click these links to help you get a feel for these rejuvenating poses. 
Fish pose

I started Electric Cobra Yoga so that I could help people find themselves in a yoga practice specific to their needs. And starting with some of my own needs helps me be a good listener to help teach my clients. I'm offering a Beginner Special of 3 one hour sessions to help people who believe they can't do yoga. Come on a yoga journey with me!
Boat pose

Thursday, February 26, 2015

Let's etsy!


Just over here getting the Pottery Verve etsy shop back up and running! It will take a bit of practice and time working out some of the kinks! 

You can click Pottery Verve on etsy to see a good old fashioned butter dish right away. Keep an eye out for updates! For your entertainment I'll create a lovely Treasury of my favourite new Springy items! Let's keep in touch!

Wednesday, February 18, 2015

Pottery Verve Spring 2015 Studio Classes-May Start!


VERVE/vərv/
Noun: 
Vigor and spirit or enthusiasm.
Synonyms: 
spirit - pep - vivacity - zest - vigour - vigour


Spring Vase or Tea Set 

Learn one of two projects! Spring vase uses slab hand building techniques with stamping and underglazes. Your vase will measure approximately 12” x 6” wet. Tea Sets use pinch pot hand building techniques, a handle and spout. Come prepared to get muddy, learn patience and have fun! $90 per person 3 hours min. Maximum 5 people. Everyone chooses the same project, yet no two ever turn out the same! Includes instruction, clay, use of studio tools, and glaze.

Wheel Throwing Basics I & II

I) Learn basic wheel throwing techniques!
This beginner series of four classes will introduce you to the basic skills of centering, coning and throwing a cylindrical shape. Try a handle too! You may even take home your first mug or cup. $120/person 4 classes 60 min. each

II) Practice Makes Pottery!
This series will get you elbows deep in a box of clay to really practice your skills. You will practice cylinders and bowls. And wedging! You will have a mug, a bowl and basic glaze. $160/person 4 classes 60 min. each


Classes begin May 2015

Also available: 

  • BIRTHDAY PARTIES at your place! - Pottery Verve loves to bring the party! You bring the cake and the kids! Let's work together and make a fantastic party, perfect for the Special Birthday Kiddo. Have a theme? AWESOME! I will design a project with your theme in mind. Ages 6+ $25/child 60-90 min. Includes clay, tools, choice of glaze and firing. Cool or what?!
  • GIRLS' NIGHT! - Dontcha just wanna try something new for a change? RIGHT!? Let's get this party started! Get dressed in your favourite slouchy tops and tights, grab yourself some girly punch and a couple of your Besties. You will have a blast creating your own hand built and personalized Girlie Drink Holder. Don't worry, it will be fine! Studio can accommodate up to 5 friends at a time. Your house? No limit! $40/person includes instruction, clay tools, choice of glaze and firing. Who's in?
email for more information potteryverve@yahoo.ca


Monday, February 16, 2015

Electric Cobra Yoga Facebook Page

So many new things happening in the life of this artist! I have started a personal and private yoga studio called 
Electric Cobra Yoga! (click the link!)

Emphasizing lifestyle, using yoga techniques and asana practice, to promote both physical and mental well-being. It's fun, it's inclusive. It's yours. Let me bring yoga to YOU! In the comfort of your space. Or in my cozy, quiet space. 

KEEP CALM
and 
BHUJANGASANA

Electric Cobra Yoga is offering all new clients a very special rate to get 
moving right away. The Grand Opening rate is 3 personalized classes for $90. 
You are welcome to join me in my private studio, or I would love 
to join you in the comfort of your own home. I am looking forward 
to working with everyone individually to create a dynamic home practice. 

You can email me to purchase your 3 sessions at electriccobrayoga@gmail.com


Subscribe to the Electric Cobra Yoga mailing list


* indicates required


    Email Format


  •