Showing posts with label art. Show all posts

Tuesday, October 20, 2015

Clean your dryer!

Let's Talk! Tuesday Tips Anyone?!

There's this inconvenient phenomenon that occurs in my laundry. Tissues get left in pockets. So they end up exploding in my washer and then in my dryer. Today after it happened I had this strange urge to vacuum out the lint catcher in my dryer. I want to say something funny and witty, but I think it's really more important that you take me seriously about this for a few minutes! Here's my Pinterest, to give my Tip credibility!            Visit Tamara M. Hannah's profile on Pinterest.   

First I removed the lint catcher and started to run hot water on it. The water was beading off, rather than draining through the mesh. I said to myself, "I think this was a good idea!" and grabbed the soap and a scrub brush. Next, I took the Dyson with the crevice tool and started to clean out the area that holds the lint catcher.....

THIS IS WHAT WAS IN THERE! I had to empty the Dyson vacuum 3 times! 
 Needless to say, I did some investigating, just to find out how all of this works. This "grate" comes off of the inside of the dryer wall just below where the lint catcher rests. Once I took it off a PILE of lint and about half a cup of sand fell out of the crevice that it covered! I was shocked and grossed out. This is how houses burn down. 


Next, I scrubbed the build up from the grate, this is how my lint catcher looked also. I vacuumed the rest of the gap where the lint was building up. I could fit my whole hand down there and was gathering hand fulls of lint. Ok, so this dryer was a second hand jobbie that was in my loft when I moved in. It didn't occur to me that cleaning it was a necessity. I'm sharing this well learned lesson with you today for the simple fact that I think it's pretty unsafe. 


 Here is my washed out lint trap! 


Here is a weird angle of the whole area that the grate piece screws on to and then where the lint catcher would sit. This photo is after I cleaned it all out.


Here's the clean grate being screwed back onto the inside of the dryer. 


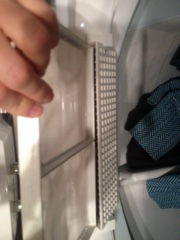
And inserting my clean lint catcher back into its holder. 

This situation made me nervous because sometimes I like to leave the dryer running when I leave the loft for work in the afternoon. Riggs isn't very good at calling 911 if you know what I mean.

So take a few minutes when you load the dryer next time and see if you have any build up in your lint catcher! This whole project only took me about half an hour, it was worth it!

This certainly isn't my most sparkly, bubbly, glittery post to date. And you'll adjust. It can't all be rainbows and kittens! 

Hey, I know how to make you feel better! 


You'll get linked up to my Pottery Verve 2015 Survey, and if you take 3 minutes to fill out my easy peasy survey...
You could win a Jack O' Lantern mug made by me! 

Thanks for following Pottery Verve xo


Wednesday, March 18, 2015

Hot Tips! Pottery tips to change your studio life a little wee bit!


Hey Pottery Pals!
Today I have to share with you some awesome hot tips!
First, "The Best Tip Ever"


You know when your underglaze lids get all crusty and dried out and really hard to open? I personally just changed my own life! Put a thin layer of Petroleum Jelly a.k.a. Vaseline, around the lid and rim of the jars. Ta-Daa! You're welcome! Saves your wrists, thumbs and time.
Not only that! It also helps seal the lids so they are a bit air tight. This helps them last longer. Hey, you know how to make your underglazes last a really long time? 
Tip #2: add water to your underglazes when you first get them. Brand new underglazes are my absolute favourite. I started using a few commercial neon glazes also. If you split off the jar into another old jar, maybe you're empty jar, you're underglazes will last twice as long. Besides, I find a couple of thin coats is better than one thick coat. Drop a round pebble or two in the jars to help shake them up when it's time to go!
Tip #3: always have the jar sitting on the table while you open it. You know why? Ever spill a whole new jar of underglaze all over your breasts while teaching a class? Ya. BTDT. Tossed the Tshirt.
Tip #4: the mini mixers are great to remix all your dried up product! 

Make sure you put some of the Vaseline on the rim of the mixer and the lid! 
Tip #5: a toothbrush can be your best cleaning tool. Glazes dry hard sometimes and stick in the worst crevices! I have about 20 toothbrushes in the studio.
Well! Take my advice today and save yourself some moolah! Potters are poor!
Bonus tip:
Use a sharpie,


And label ALL THE THINGS! 


It makes it so much easier on "Artist Brain" while you're in the zone. 


Wednesday, February 18, 2015

Pottery Verve Spring 2015 Studio Classes-May Start!


VERVE/vərv/
Noun: 
Vigor and spirit or enthusiasm.
Synonyms: 
spirit - pep - vivacity - zest - vigour - vigour


Spring Vase or Tea Set 

Learn one of two projects! Spring vase uses slab hand building techniques with stamping and underglazes. Your vase will measure approximately 12” x 6” wet. Tea Sets use pinch pot hand building techniques, a handle and spout. Come prepared to get muddy, learn patience and have fun! $90 per person 3 hours min. Maximum 5 people. Everyone chooses the same project, yet no two ever turn out the same! Includes instruction, clay, use of studio tools, and glaze.

Wheel Throwing Basics I & II

I) Learn basic wheel throwing techniques!
This beginner series of four classes will introduce you to the basic skills of centering, coning and throwing a cylindrical shape. Try a handle too! You may even take home your first mug or cup. $120/person 4 classes 60 min. each

II) Practice Makes Pottery!
This series will get you elbows deep in a box of clay to really practice your skills. You will practice cylinders and bowls. And wedging! You will have a mug, a bowl and basic glaze. $160/person 4 classes 60 min. each


Classes begin May 2015

Also available: 

  • BIRTHDAY PARTIES at your place! - Pottery Verve loves to bring the party! You bring the cake and the kids! Let's work together and make a fantastic party, perfect for the Special Birthday Kiddo. Have a theme? AWESOME! I will design a project with your theme in mind. Ages 6+ $25/child 60-90 min. Includes clay, tools, choice of glaze and firing. Cool or what?!
  • GIRLS' NIGHT! - Dontcha just wanna try something new for a change? RIGHT!? Let's get this party started! Get dressed in your favourite slouchy tops and tights, grab yourself some girly punch and a couple of your Besties. You will have a blast creating your own hand built and personalized Girlie Drink Holder. Don't worry, it will be fine! Studio can accommodate up to 5 friends at a time. Your house? No limit! $40/person includes instruction, clay tools, choice of glaze and firing. Who's in?
email for more information potteryverve@yahoo.ca


Sunday, September 8, 2013

Work bag Inventory


Each shift when I'm packing up my lunch I wonder how can my bag really be so heavy? There's not that much in my lunch really. Then tonight I really thought about the items that have permanent residence in this bag. And I'm compiling a list. Mostly for my own Bag inventory status, but maybe someone else will relate. 
This bag, from Under Armour, has a lifetime guarantee. I'm not sure who's lifetime exactly, but in haul trucker land bags get pretty beat up. I purchased this one in 2008 when I was at Aurora with 501. People used to always tease me about it. Whatever. When it's fully loaded, like right now, it probably weighs a good forty pounds. I should weigh it...
It has a big main compartment and three auxiliary compartments. 
In the main compartment I pack up a cooler bag with my lunch. Tonight I have packed: 
Thermos with energy smoothie and straw
Thermos with lemon ice water
Thermos with ice
Bottle of gingerale
2 slices donair pizza
Spinach salad with strawberries, onion, celery, donair sauce
3 celery
Baggie of vitamins
I just realized I forgot a fork for my salad. I have been known to use coffee stir sticks as chopsticks when this happens.
On top of the cooler bag I pack in my activity baggs:
2 ziploc bags with a sketchbook, note pad, graph paper, blank paper, 12 sharpie markers, 2 black pens, one blue pen, 3 pencils, 6 highlighters, 6 sparklie pens. An eraser. Tape. Fluorescent orange post its. 
Also I packed in some Voltaren, Advil and a facecloth with ice cubes and lavender. This is the pain and fatigue care package. 
At the last minute before leaving I tossed in a third slice of pizza and the bag of lime tortilla chips. What!?
Already you can see the bulk of the weight of this bag!
I'll try to finish up quick. One outside aux space holds my coffee mug, a French press coffee mug with ground coffee (both stainless) a jar of honey, and a toiletries bag. This bag holds a toothbrush, toothpaste, bobby pins, a mirror, tweezers, lavender essential oil, and chewable pepto bismol.
In the other end is the second aux space where I have shoved an extra tshirt, keys, socks, earbuds, charger, arm Warmers and Puffs. 
Last! There's a side aux compartment where I stash my glasses, extra safety gloves, ear plugs, FLRA forms and a flashlight/clock combination. Right now my new team long sleeve shirt is also shoved in there. 
That's a lot of stuff! I compiled this list from memory so who knows what I haven't included.
Eleven and a half hours is a long stretch. I come up with my best ideas, plans and lists during this time. 
If you had to pack for a shift this long what would you bring?